Video Description: MLA Tutorial #1: Basic Paper Formatting
The Modern Language Association helps students write papers that are simple for other students to read and for teachers to grade. The MLA developed this format with a concern for easy reading and easy grading. It will produce a paper that allows readers to consider what you have written rather than worrying about how you have presented it.
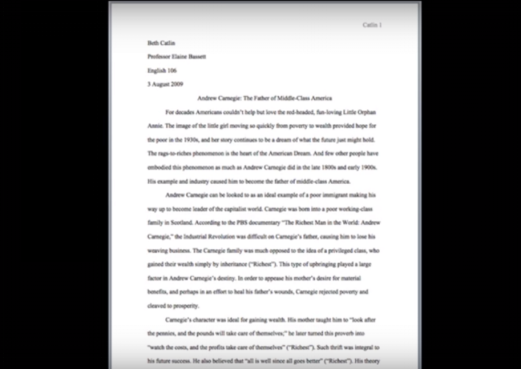
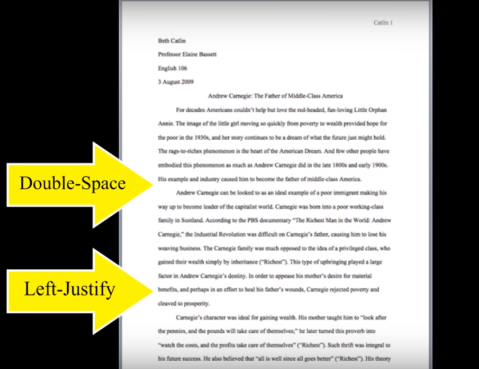
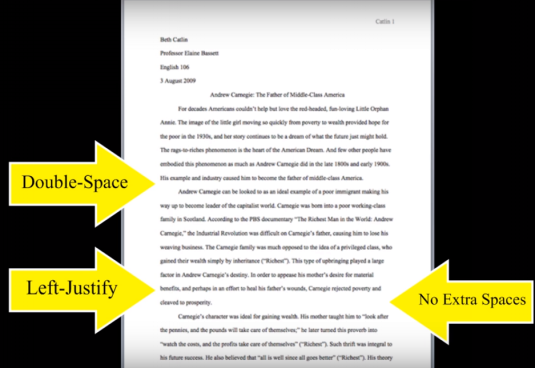
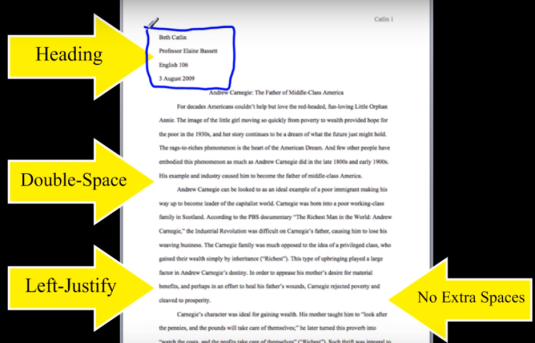
The basic format calls for some fairly simple rules. We’ll go over them in this article. This is a standard MLA formatted paper.
MLA Qualities
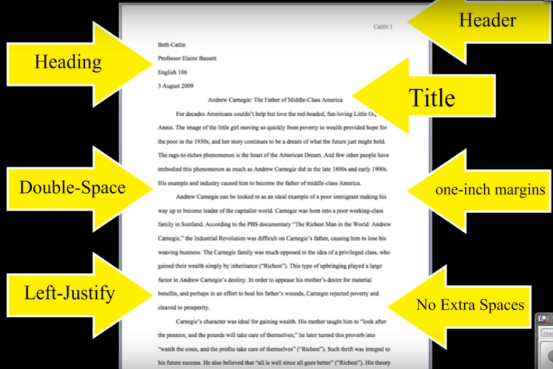
- First of all, make sure todouble-space all writing in the entire This includes:
- the heading;
- thetitle;
- all other sections;
- works cited page.
So, make sure to double space everything.
- Left- justify the entire paper. You’ll see aflush edge on the left and a jagged one on the right.
- Include no extra spaces between paragraphs. Microsoft Word 2007 and later versions include a default 10-point space after every enter stroke. Eliminate this extra space.
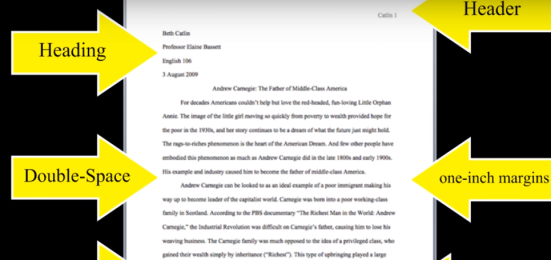
- On the first page include a heading with four pieces of information on separate lines:
- the author’s name;
- the teacher’s name;
- the course title;
- date formatted with a spelled out month.
As with the rest of the paper left-justify and double-space this heading.
- Use one-inch margins all around: top, bottom, left, and right.
- On multi-page papers include the header in the top right-hand corner with author’s last name and page number. Most word processing programs can include a header with progressive page numbers, so you don’t have to change it for every page. Check it with your software for details on how to accomplish this.
- Center the title on the line below the heading. Do not add extra spaces before or after it. And do not bold, underline, or italicize the title. Use the same 12-point font as for everything else.
- That brings us to the last point 12 point Times New Roman font. The entire MLA paper should be formatted according to a recognizable and standard font like Times New Roman, New York, Helvetica. Use something standard. Times New Roman is a great default and 12-point size for everything including the title.
The format is simple to follow with standard word processing software like Microsoft Word. You can even set defaults for certain format commands like margins, so if you want to make sure that your margins are one inch all around every time in a program like Word you can set the default for that. Check with your software for more details but every time you format an MLA paper make sure it looks like the following example.
Microsoft Word 2007 space setting
In Microsoft Word 2007 every time you press the Enter key, an extra 10 point space appears after the line that you just typed, creating extra spaces beyond the double spacing between paragraphs, removing the setting that is fairly simple but remember it does come installed as a default setting once you install the software when you access the paragraph menu.
Now you will learn how to access that. You can see in this picture that after spacing the is set for ten point font.
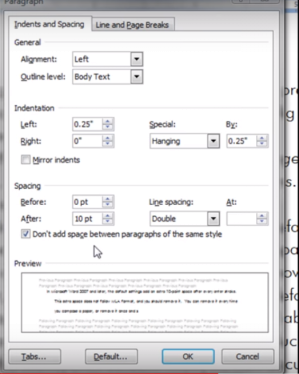
Once you see that you can reduce it down to zero such as you can see in this picture, reduce that to zero:
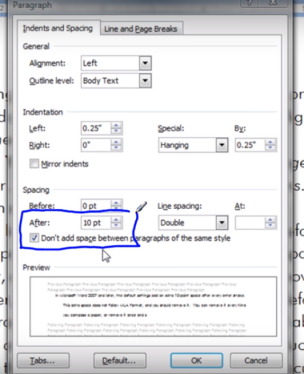
You can also make that your default by pressing the button down at the bottom of the window. It will ask you if you want to make that your default. You say “Yes,” and you’re good to go.
Here’s how you can access that menu. Take a look at Microsoft Word. You can right-click anywhere on an empty page and go to the paragraph menu very quickly.
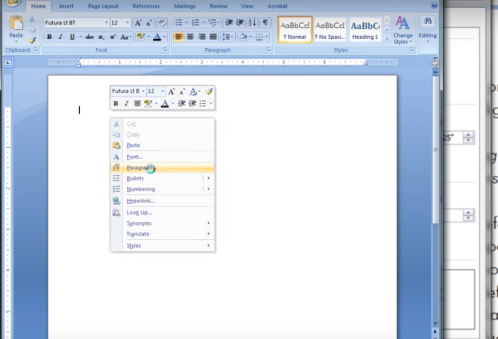
If you don’t want to access it that way in 2007, you can access the paragraph menu next to the paragraph command easily. You can change those settings and set them to your default and never have to worry about it again.
To conclude, MLA format is simple if you follow these instructions. Set your defaults and understand your software.


